
Plinth with LED
At night is it always a problem, if you have to go to the toilet, because you need a light.
Until now we used the normal light, but this is really bright.
I had the idea to create a light which is more soft and serve the purpose.
So I started to develop a plinth with integrated LED´s.


Watch the YouTube video or read the description below

The system consists of
- 3 parts plinth
- 2 connections (wires inside the floor)
- 2 LED bands incl. transformator (behind the cover of the floor heating)


During the building of our house I put hose and wires into the floor. This was only a preparation to use it now.
The base for this project was some plinth (oak) which we use in the whole house.
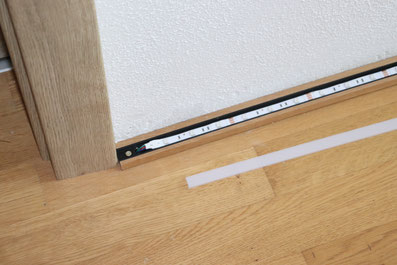
I ordered 6m u-profil (17 x 7mm) together with an opal cover.


After the cutting process I started to mill the groove into the plinth to put the u-profile inside.
Therefore I used a cutter with a diameter d = 17mm.
I put the cutter to the router table and adjusted it to
a depth of 7mm and to the middle of the plinth.
I made the groove within two passes.


To eliminate the roundness of the cutter at the end of the plinth I used a chisel.
The next step was to drill holes (3mm) for fixing the plinth on the floor and holes (8mm) to pass the connecting wires through.
The 8mm holes I made at the beginning and the end of every plinth.


The woodworking activities were ready and so I could start with the elctrical part.
Therefore I ordered 2 LED bands (5m with 300 LED´s), 5 connectors and 2 connection cables (each 2m).
To pass the LED band through the hole it was necessary to cut the wires and solder them later to the LED band.
When I was ready to fix the plinth with the LED´s on the floor I found out, that the diameter of the hose is to small to pass the wire with the plug through.
So I cut the wire of the LED band and from the connection cable too and soldered them directly together.
Finally I put the Opal cover to the u-profile.
The whole system is controlled by a central located motion detector.

Plan
- Not existing
Material
- Plinth (oak)
- U-profil (Aluminium brown)
- Cover (opal)
- LED band
- Nails
- Wires
Tools
- Festool Mitre saw KS120 EB Kapex
- Festool Fastening clamp FSZ (2 pcs.)
- Bosch router POF 1400
- Ferm Router table
- Cutter d=17mm
- Bosch Table drilling machine PBD 40
- Drill 8mm/ 3mm
- Makita Driver drill kit
- Wolfcraft clamps
- Soldering station
- Hand tools (Chisel, Screwdriver,...)
Lessons learned:
- Take care that you have enough U-profile. I had 1m to less...
- Do the milling process for the groove in more than one step. More steps give a more beautiful structur and the cutter has a longer lifetime.
- Drill the holes large enough for passing the wires. In the other case you can destroy the LED band.
- Take care that you have 2 LED bands from the same company. If you have two different ones there is a big risk that they have a different light colour.